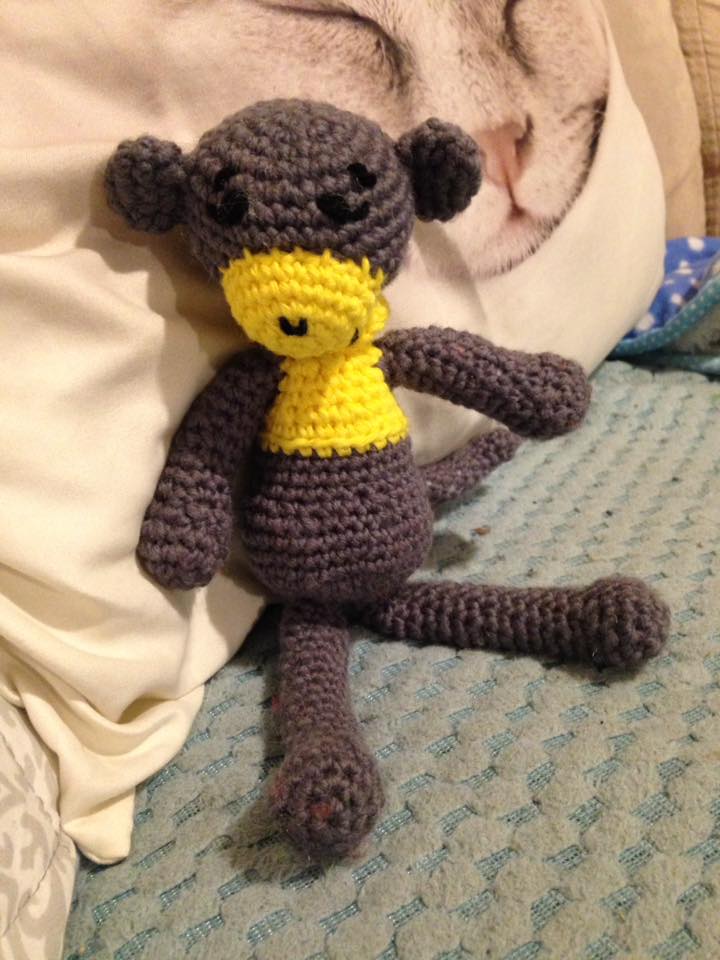
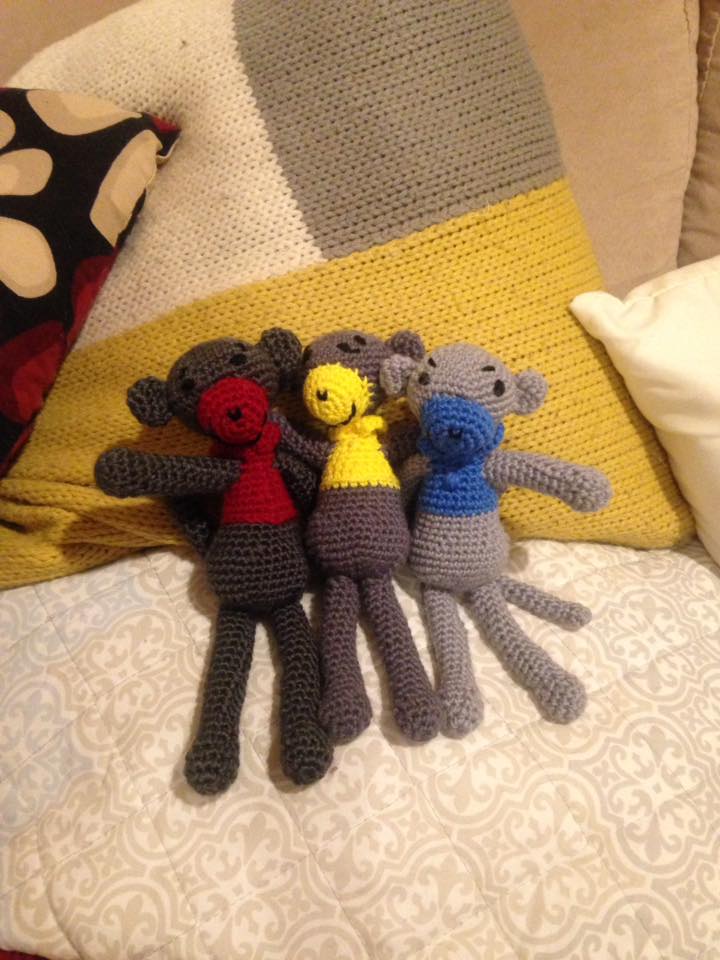
Amigurumi Little Mini Monkey Crochet (5 little monkeys jumping on the bed - nursery rhyme prompt)


MINI MONKEY


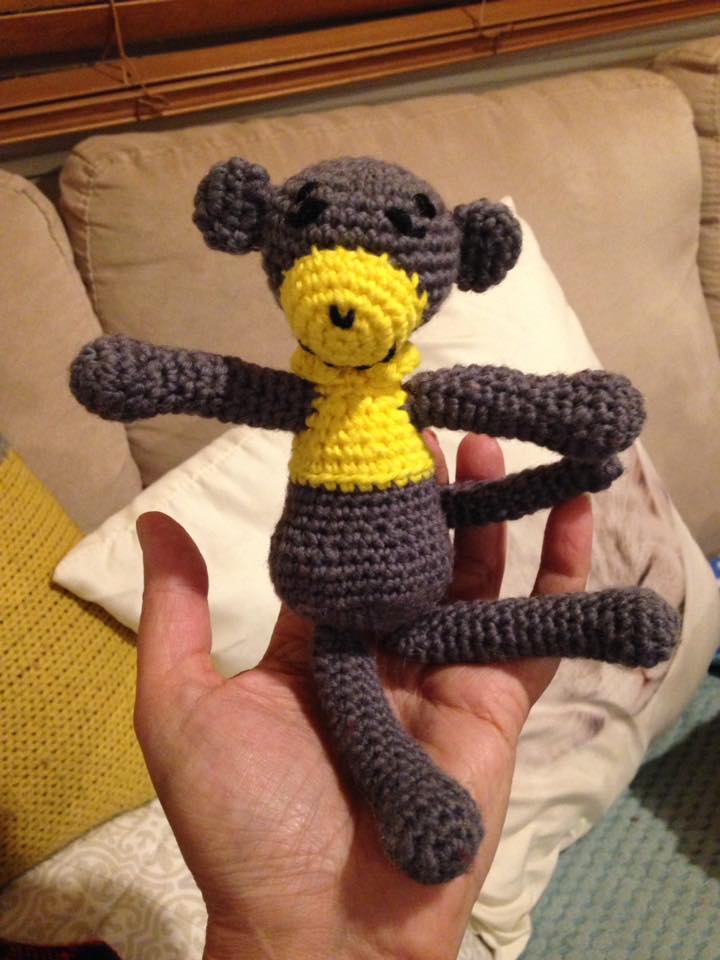
Make 5 using different primary colours for shirt and nose, 

Abbreviation Key

Instruction
Code
Chain st
Ch
Slip stitch
Sl st
increase
Inc
decrease
Dec
Single crochet
Sc
Double crochet
dc


Instructions                                        (number of stitches in each row)
LEGS (make 2)
Magic circle                                         6
Inc in each sc                                      12
(sc, sc, inc)                                          16
(sc,sc,dec)                                           12
(sc,dec)                                                 8
Sc around each row 15 times           8
Fasten off leaving enough length for sewing

ARMS (make 2)
Magic circle                                         6
Inc in each sc                                      12
(sc, sc, inc)                                          16
(sc,sc,dec)                                           12
(sc, dec)                                               8
Sc round each row 10 times           8
Fasten off leaving enough length for sewing

TAIL (make 1)
Magic circle                                         6
Ch 1,
sc round in a circle non stop       100 sc
Fasten off leaving enough length for sewing

EARS (make 2)
Magic circle                                         6
Inc in each sc                                      12
Sc around row                                   12
Dec in each sc                                    6
Fasten off leaving enough length for sewing

NOSE (make 1) (in color of monkey shirt
Magic circle                                         6
Inc in each sc                                      12
(sc, inc)                                                 18
(sc around row) x 2                         18
Fasten off leaving enough length for sewing

HEAD (make 1)
Magic circle                                         6
(inc in each sc)                                   12
(sc in next sc, inc)                             18
(sc in next 2sc, inc)                          24
(sc in next 3sc, inc)                          30
(sc in next 4sc, inc)                          36
Sc around row x4                             36
(sc in next 4sc, dec)                         30
(sc in next 3sc, dec)                         24
(sc in next 2sc, dec)                         18
(sc in next sc, dec)                           12
Sc around last row                           12
Fasten off leaving enough length for sewing


BODY (make 1)
Magic circle                                         6
(inc in each sc)                                   12
(sc in next sc, inc)                             18
(sc in next 2sc, inc)                          24
(sc in next 3sc, inc)                          30
(sc in next 4sc, inc)                          36
Sc around entire row x 3               36
(sc in next 4sc, dec)                         30
(sc in next 3sc, dec)                         24
Sc around entire row x 3               24
                CHANGE COLOUR – (use colour of nose)
Sc round entire row x 2                 24
(sc in next 2sc, dec)                         18
Sc round entir3e row x 2               18
(sc in next sc, dec)                           12
Sc around entire row x 3               12
***…Continue to make the COLLAR, DO NOT FASTEN OFF.
Sl st into next 6 sc (this changes the position of the starting row and puts the seam of the body
(jogging) at the back.)
Ch 2
dc x 2 into each of next 12 sc,     24
2sl st down the side of the last dc.
Fasten off leaving enough length for sewing


COMPLETING:
Stuff each body part relatively firmly, but not enough to make it stiff and inflexible.  It should have some softness but firmness. You can use toy stuffing or a cushion insert stuffing that is freshly bought or used solely for stuffing purpose. 
Complete the head and the body separately; attaching appropriate parts to each first, and completing head with nose, ears, eyes, mouth and eyebrows; and then joining together at the neck.
For the head, place the nose first, lining it up just in from the edge of the neck hole; and before fully completing the attachment, poke some filling into it. 
Use black wool to embroider the mouth, nose, eyes and eyebrows positioning them as you feel suits. Positioning the eyebrows in different positions will allow the face to have some expression, as will the angle you place the eyes.  Using wool to embroider eyes, instead of safety button eyes, makes the monkey 99.9% child safe. 
Using the long threads you left attached when fastening off each body part, position the part in an appropriate place and sew, joining it to the larger part securely.  Fasten off by threading the wool multiple times in and out of the body part; and then cut at the very edge so that the end disappears back into the body part.


Comments

Popular posts from this blog

Galumph crochet frog Amigurumi Toy

Galumph Frog Original pattern – Maria Coulter (grandmashook.blogspot.com) Please feel free to share the pattern or frogs made from this pattern.   This pattern is not available for sale as a pattern, a product or a toy. This pattern is for gift purposes only. Key: (      ) -   repeat this sequence until the end of the row or next instruction Sc – single crochet Dc – double crochet Sl st – slip stitch Ch – chain Inc – increase using sc (2sc into 1 stitch space) Dec – decrease using sc (make 2sc stitches from previous row into 1 sc stitch for the working row) Head: (use green wool) Instruction                                                           Stitches per row 1.magic circle using sc                                          6 2.inc in each sc around row                                   12 3.(sc, inc)                                                              18 4.(2sc, inc)                                                          

Ballerina Amigurumi

Ballerina Mouse Amigurumi Arms …make 2 Stuff as you go. Using light pink… R1: Magic circle (6) R2: 2sc in each st (12) R3 – R4: sc in each st (12) R5: (sc in next st, dec) repeat (8) R6 – R28: sc in each st Fasten off leaving tail for attaching Legs … make 2 R1: Ch 9 R2: in 2 nd ch from hook, 7sc down startin length, 4sc into starting ch, 6sc across base of each sc in original 8ch length, 3sc into base of 1 st sc (8 th ch). (21 stitches forming an oval shape) R3: (7sc, sc inc) x 3 R4-R5: 26sc R6: (7sc, sc dec) x 3, complete row with 13sc R7: 4sc, (sc dec x3), 4sc, turn, working back along this row, ch 1, (dec x 5), turn, working back on right side, 15sc back to line marker. R8: sl st into next 2sc, into back loop of next st, using light pink, sl st and ch1, sc into same st and continue 14sc (15) R9-R10: 15sc R11 (3sc, dec) x 3 (12) R12-R16: 12sc (stuff and shape the bootie) R17: 12sc. Fasten off. Body …. In dark pink R1: m